아래 글은 오래 되어 도커 이미지 등이 삭제 되었으니 공부 차원이 아니라 이용을 하려면 아래 확인 하세요 ‘ㅅ’a
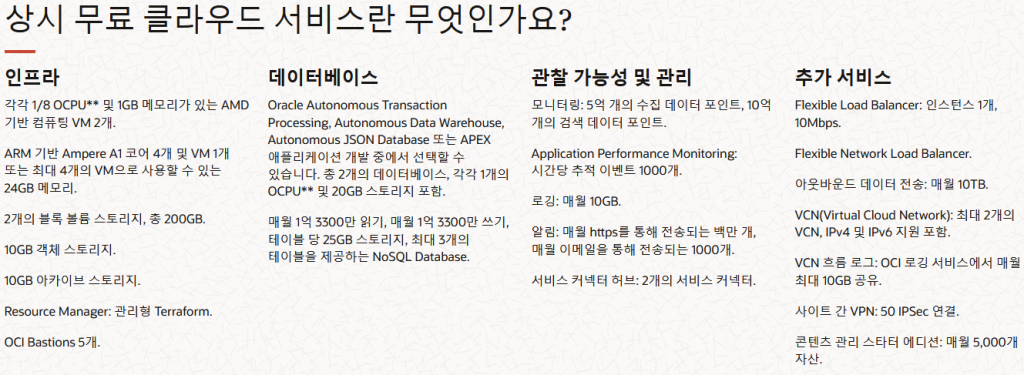
OCI 에서 제공 되는 “항상 무료 적격” 서비스에 ARM64 서버로 Apache, Php, MariaDB 를 운영 하고자 하였으나
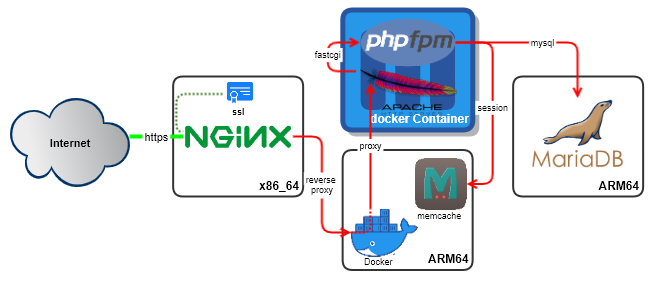
aarch64 커널에서는 snapd 설치가 가능하지만 lets encrypt 사용이 불가능 하여 불가피 하게 x86_64 서버를 앞에 하나 두어
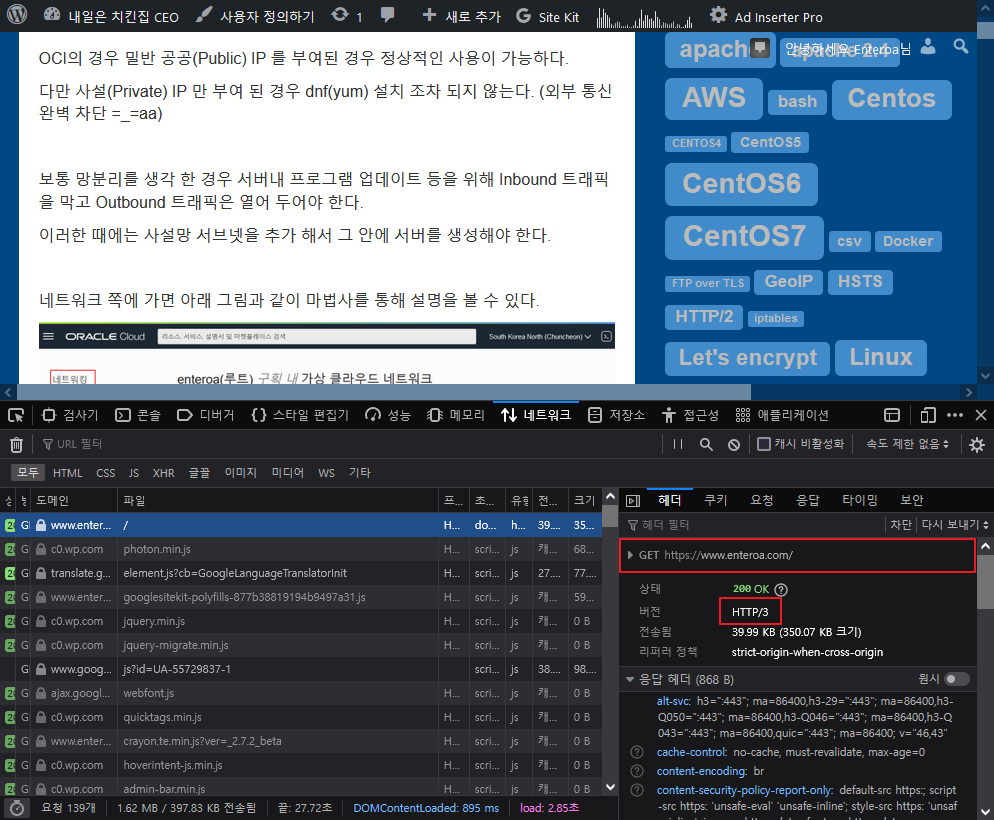
reverse proxy 할 계획을 세우다 보니 HTTP/3 를 적용하는 부분도 포함해 진행 한다.
알고 가야 하는 부분은 http3 를 구현 하는 nginx-quic 의 경우 아직 테스트 레벨이라는 점이다.
tier 1 = x86_64 – oracle linux 8 – nginx
tier 2 = arm64 – oracle linux 8 – memcache, docker – amazon linux – httpd, php-fpm
tier 3 = arm64 – oracle linux 8 – mariadb
아래 두 글에 이어서 익숙하겠지만 그것을 한다.
|
1 2 3 4 5 6 7 8 9 10 11 12 13 14 15 16 17 |
# 타임존 설정 ~]# ln -sf /usr/share/zoneinfo/Asia/Seoul /etc/localtime # oracle-epel-release 활성화 (이부분은 oracle-epel-ol8.repo 에서 enabled=0 처리가 되어 있어서 하는 부분..) ~]# yum-config-manager --enable ol8_developer_EPEL ol8_developer_EPEL_modular # OS 업그레이드 ~]# dnf -y upgrade # 업그레이드 후 재부팅 ~]# reboot # 필수 프로그램 설치(sealert, htop, pstree) ~]# dnf install psmisc htop setools-console setroubleshoot-server # vim 사용 설정 ~]# echo "alias vi=vim" >> /etc/bashrc |
편리한 dnf(yum) 설치를 위해 codeit.guru 레포지토리를 추가 한뒤에 nginx:codeit-quic 설치를 한다.
|
1 2 3 4 5 |
~]# dnf install -y https://repo.codeit.guru/codeit-repo-release.el8.rpm ~]# dnf module enable -y nginx:codeit-quic ~]# dnf install -y nginx ngtcp2 nginx-module-image-filter GeoIP-GeoLite-data brotli snapd |
snapd 를 활용하여 Let’s encrypt 를 설치 한다.
|
1 2 3 4 5 6 7 8 9 |
~]# ln -s /var/lib/snapd/snap /snap ~]# systemctl enable --now snapd.socket ~]# snap install core ~]# snap refresh core ~]# snap install --classic certbot ~]# ln -s /snap/bin/certbot /usr/bin/certbot |
웹서버의 보안 향상을 위해 Diffie-Hellman param 파일을 생성한다.
|
1 2 |
~]# mkdir /etc/pki/nginx ~]# openssl dhparam -out /etc/pki/nginx/dhparam.pem 4096 |
서버 내부의 파이어월에 사용할 서비스 및 포트를 등록 하고 확인 한다.
|
1 2 3 4 5 6 7 8 |
~]# firewall-cmd --add-service=http --add-service=https --permanent ~]# firewall-cmd --add-port=443/udp --permanent ~]# firewall-cmd --reload ~]# firewall-cmd --list-all public (active) services: http https ssh ports: 443/udp |
nginx.pid 생성, /var/www/html 엑세스(Let’s encrypt 인증서 http 인증) 및 리버스 프록시 구현을 위한 selinux 를 설정 한다.
|
1 2 3 4 5 6 |
~]# setsebool -P httpd_can_network_relay 1 ~]# setsebool -P httpd_graceful_shutdown 1 ~]# setsebool -P nis_enabled 1 ~]# semanage fcontext -a -t httpd_var_run_t "/var/run/nginx.pid" ~]# semanage fcontext -a -t httpd_sys_content_t "/var/www/html(/.*)?" |
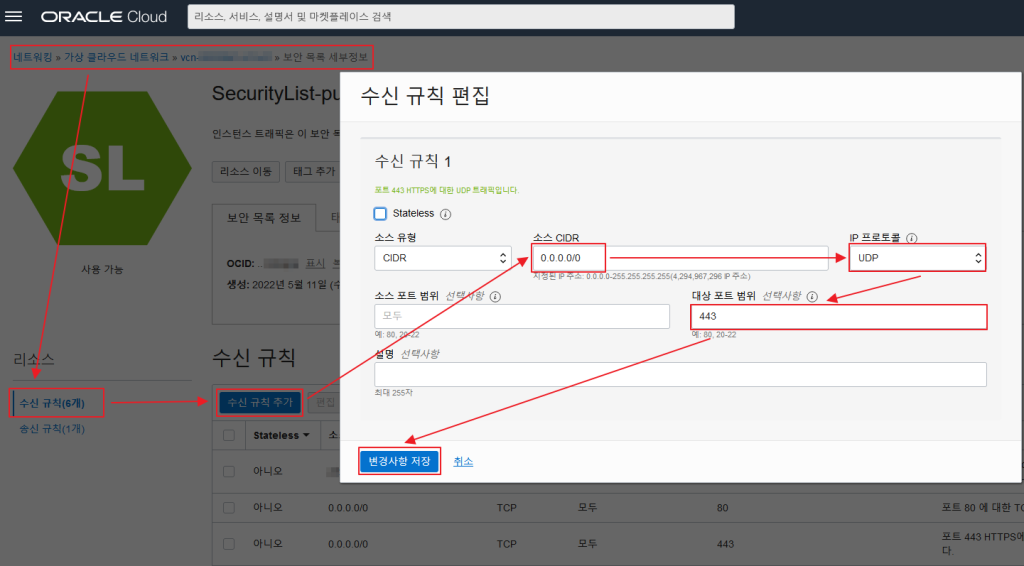
OCI 클라우드 내에서의 보안 목록(Security List) 에서 아래와 같이 UDP :443 을 허용해 준다.
/etc/nginx/nginx.conf 파일을 수정 한다.
|
1 2 3 4 5 6 7 8 9 10 11 12 13 14 15 16 17 18 19 20 21 22 23 24 25 26 27 28 29 30 31 32 33 34 35 36 37 38 39 40 41 42 43 44 45 46 47 48 49 50 51 52 53 54 55 56 57 58 59 60 61 62 63 64 65 66 |
user nginx; worker_processes auto; error_log /var/log/nginx/error.log notice; events { worker_connections 1024; } http { include /etc/nginx/mime.types; default_type application/octet-stream; charset utf-8; geoip2 /usr/share/GeoIP/GeoLite2-Country.mmdb { $geoip2_data_country_iso_code country iso_code; } log_format main '$host $remote_addr - $remote_user [$time_local] "$request" ' '$status $body_bytes_sent "$http_referer" "$http_user_agent" $geoip2_data_country_iso_code'; access_log /var/log/nginx/access.log main; keepalive_timeout 65; server_tokens off; sendfile on; brotli on; brotli_types text/css text/x-component application/x-javascript application/javascript text/javascript text/x-js text/richtext image/svg+xml text/plain text/xsd text/xsl text/xml image/x-icon application/octet-stream; gzip on; gzip_vary on; gzip_types text/css text/x-component application/x-javascript application/javascript text/javascript text/x-js text/richtext image/svg+xml text/plain text/xsd text/xsl text/xml image/x-icon application/octet-stream; etag off; resolver 8.8.8.8 8.8.4.4 valid=300s ipv6=off; resolver_timeout 5s; server_names_hash_bucket_size 128; ssl_trusted_certificate /etc/pki/tls/certs/ca-bundle.crt; ssl_dhparam /etc/pki/nginx/dhparam.pem; ssl_session_tickets off; ssl_session_timeout 24h; ssl_session_cache shared:SSL:30m; ssl_protocols TLSv1.2 TLSv1.3; ssl_ciphers ECDHE-ECDSA-AES128-GCM-SHA256:ECDHE-RSA-AES128-GCM-SHA256:ECDHE-ECDSA-AES256-GCM-SHA384:ECDHE-RSA-AES256-GCM-SHA384:ECDHE-ECDSA-CHACHA20-POLY1305:ECDHE-RSA-CHACHA20-POLY1305:DHE-RSA-AES128-GCM-SHA256:DHE-RSA-AES256-GCM-SHA384; ssl_buffer_size 8k; ssl_stapling on; ssl_stapling_verify on; ssl_prefer_server_ciphers on; client_max_body_size 100m; client_body_buffer_size 10m; proxy_request_buffering off; proxy_connect_timeout 90; proxy_send_timeout 90; proxy_read_timeout 90; proxy_buffers 32 256k; proxy_buffer_size 128k; proxy_busy_buffers_size 256k; include /etc/nginx/conf.d/*.conf; server { listen 80; server_name _; root /var/www/html/; deny all; expires off; location / { index index.html index.htm; } error_page 403 404 500 502 503 504 /50x.html; location = /50x.html { root /usr/share/nginx/html; internal; } } } |
Let’s encrypt 인증서 발급을 위한 http 가상호스트를 수정 한다. vi /etc/nginx/conf.d/default.conf
|
1 2 3 4 5 6 7 8 9 10 |
server { listen *:80; server_name www.enteroa.com enteroa.com; location ^~ /.well-known/acme-challenge/ { root /var/www/html/; } location / { return 301 https://$host$request_uri; } } |
conf 파일을 설정한 뒤 nginx 를 활성화 및 시작 한다.
|
1 |
~]# systemctl enable --now nginx |
Let’s encrypt 인증서를 발급 한다. (성공시 Successfully received certificate 메세지 가 확인 된다.)
|
1 2 3 4 5 6 7 8 |
~]# certbot certonly --server https://acme-v02.api.letsencrypt.org/directory \ --rsa-key-size 4096 --agree-tos \ --email 자신의@이메일.주소 --webroot -w /var/www/html \ -d www.enteroa.com -d enteroa.com Successfully received certificate. Certificate is saved at: /etc/letsencrypt/live/www.enteroa.com/fullchain.pem Key is saved at: /etc/letsencrypt/live/www.enteroa.com/privkey.pem |
https 가상호스트 설정 파일을 추가 생성 한다. vi /etc/nginx/conf.d/default-ssl.conf
|
1 2 3 4 5 6 7 8 9 10 11 12 13 14 15 16 17 18 19 20 21 22 23 24 25 26 27 28 29 30 31 32 33 34 35 36 37 38 39 40 41 42 43 44 45 46 47 48 49 50 51 52 53 54 55 |
upstream WasProxy01 { ip_hash; server 프록시.대상.서버.아이피:80; # WAS 서버 IP를 넣는다. } server { # www가 없는 도메인은 www.도메인 으로 이동하도록 한다. listen 443 ssl http2; server_name enteroa.com; location / { return 301 https://www.$host$request_uri; } ssl_certificate /etc/letsencrypt/live/www.enteroa.com/fullchain.pem; ssl_certificate_key /etc/letsencrypt/live/www.enteroa.com/privkey.pem; add_header Strict-Transport-Security "max-age=31536000; preload"; } server { listen 443 http3 reuseport; # 한개의 nginx 에 하나의 http3 만 선언이 가능하다. listen 443 ssl http2; server_name www.enteroa.com; proxy_redirect off; proxy_set_header Host $host; proxy_set_header X-Real-IP $remote_addr; proxy_set_header X-Forwarded-For $proxy_add_x_forwarded_for; proxy_set_header X-Forwarded-Host $server_name; proxy_set_header SSL_PROTOCOL $ssl_protocol; proxy_set_header SSL_CLIENT_CERT $ssl_client_cert; proxy_set_header SSL_CLIENT_VERIFY $ssl_client_verify; proxy_set_header SSL_SERVER_S_DN $ssl_client_s_dn; proxy_hide_header Upgrade; if ( $request_method !~ ^(GET|POST|HEAD|OPTIONS)$ ) { # 사용가능 메소드 제한 return 405; } location = /robots.txt { # robots.txt 로그 남기지 않음 access_log off; } location = /favicon.ico { # favicon.ico 로그 남기지 않음 access_log off; } location ~ /\. { # dot(.)으로 시작 되는 파일의 접속 차단 deny all; } location ~ ~$ { # dollar($)으로 시작 되는 파일의 접속 차단 deny all; } location / { proxy_pass http://WasProxy01; } ssl_certificate /etc/letsencrypt/live/www.enteroa.com/fullchain.pem; ssl_certificate_key /etc/letsencrypt/live/www.enteroa.com/privkey.pem; quic_retry on; ssl_early_data on; add_header Alt-Svc 'h3=":443"; ma=86400,h3-29=":443"; ma=86400,h3-Q050=":443"; ma=86400,h3-Q046=":443"; ma=86400,h3-Q043=":443"; ma=86400,quic=":443"; ma=86400; v="46,43"'; add_header QUIC-Status $http3; add_header Strict-Transport-Security "max-age=31536000; includeSubDomains; preload"; add_header Content-Security-Policy-Report-Only "default-src https:; script-src https: 'unsafe-eval' 'unsafe-inline'; style-src https: 'unsafe-inline'; img-src https: data:; font-src https: data:"; } |
default.conf 파일과 default-ssl.conf 파일은 하나로 병합해서 사용 해도 관계는 없다.
가상 호스트를 생성 한 뒤 nginx 를 reload 한다.
|
1 |
~]# nginx -s reload |
위까지 진행 한 경우 http3 를 지원 하는 웹서버의 설정이 모두 끝난다.
다만 구성상 외부서비스 제공은 https 내부에서의 통신은 http 프로토콜을 사용하기 때문에 기본 상태의 wordpress 의 에러메세지를 볼 수 있다.
was 서버에서 운영되는 워드프레스의 wp-config.php 파일에 /* That's all, stop editing! Happy blogging. */ 위 부분에 아래 소스를 삽입 해야 한다.
|
1 2 3 4 5 6 7 8 9 10 |
if ((!empty( $_SERVER['HTTP_X_FORWARDED_HOST'])) || (!empty( $_SERVER['HTTP_X_FORWARDED_FOR'])) ) { // http://wordpress.org/support/topic/wordpress-behind-reverse-proxy-1 $_SERVER['HTTP_HOST'] = $_SERVER['HTTP_X_FORWARDED_HOST']; // http://wordpress.org/support/topic/compatibility-with-wordpress-behind-a-reverse-proxy $_SERVER['HTTPS'] = 'on'; // rewrite blog word with wordpress //$_SERVER['REQUEST_URI'] = str_replace("wordpress", "blog", $_SERVER['REQUEST_URI']); } |
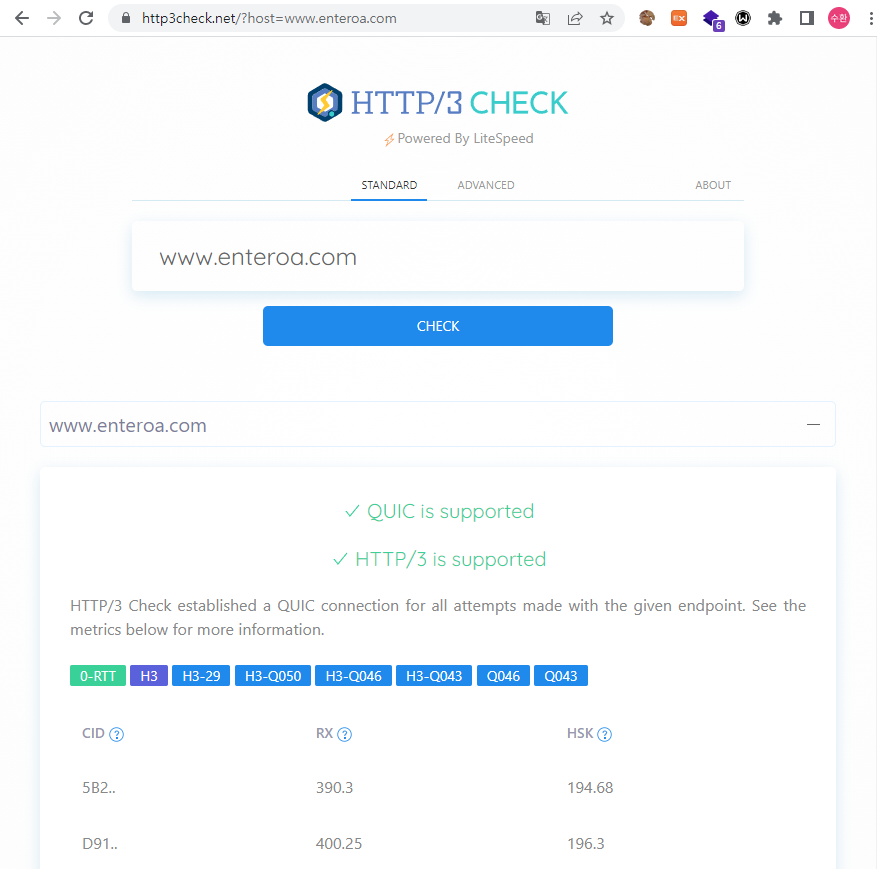
브라우져 접속 및 체크 사이트(https://http3check.net/) 접속을 통해 HTTP/3 이 활성화 되었는지 확인 한다.
